Access Your Home OpenClaw AI Workspace Remotely
Sign into the same HomiPlay account on every device and bring your AI workspace with you.
Access OpenClaw and your AI resources as if everything were still on the same private network.
Overview
More people are running OpenClaw, local LLMs, and AI agents on their home computers to create a personal AI workspace.
The challenge is that these systems are usually only accessible from inside the home network. Remote access often means exposing services to the internet or setting up a traditional VPN just to connect from outside.
That creates new problems. Public-facing services can become easy targets for scans and attacks, while VPN setups often require fixed IPs, firewall rules, and additional network maintenance that most users do not want to deal with.
HomiPlay makes this much simpler. By signing into the same HomiPlay account across devices, you can create a secure direct connection that lets you access your home OpenClaw and AI resources remotely as if your devices were still on the same private network.
🔐 Private AI Tunnel: Secure access to your home AI resources.
🔗 P2P Direct Connection: Fewer relays, more stable connectivity.
🧩 Simple Setup: No VPN, fixed IP, or port forwarding required.
Benefits
Access your home OpenClaw and local LLMs remotely
Reduce the risks of exposing AI services publicly
Skip complex VPN and network configuration
Get a smoother, more stable remote AI workflow experience
Setup Steps
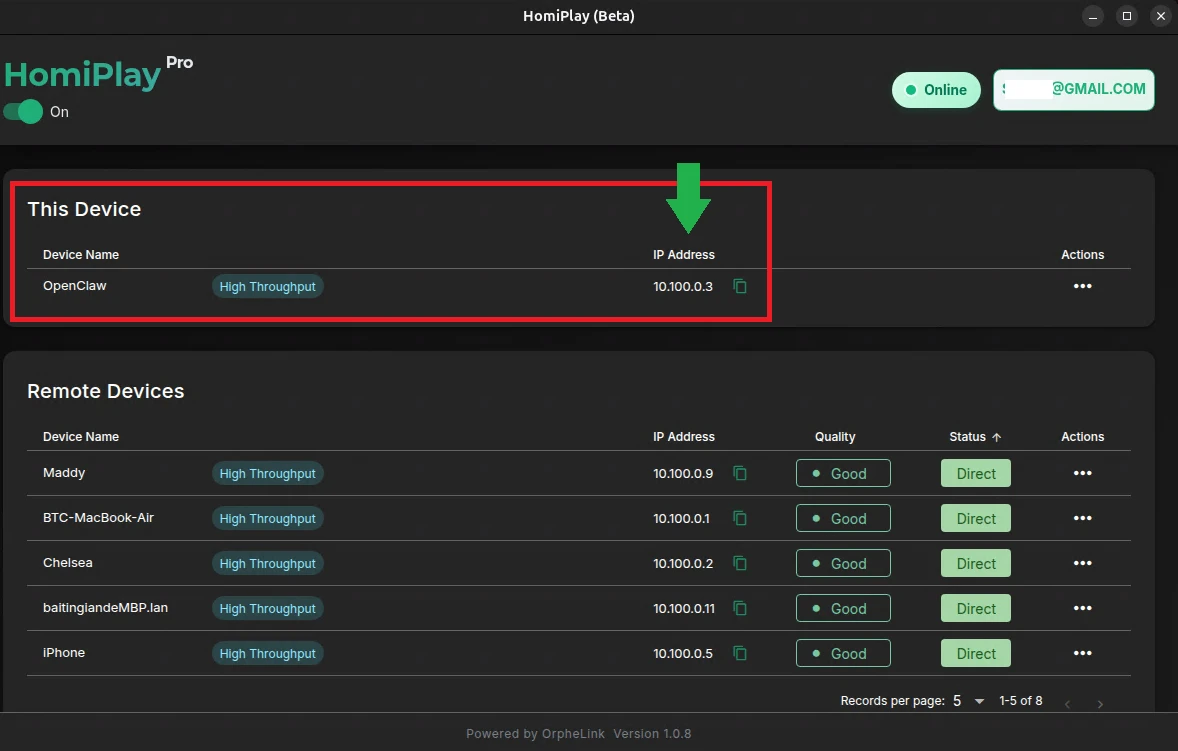
Get Your HomiPlay IP
On the OpenClaw host device, open the HomiPlay interface and find the “This Device” section. You’ll see the IP address assigned to that device by HomiPlay (this guide uses 10.100.0.3 as an example).
Configure the OpenClaw Gateway
Next, we need to prepare OpenClaw for remote access and set a secure access token. Open the OpenClaw configuration file: ~/.openclaw/openclaw.json. In the gateway section, add your access token and allow connections from your HomiPlay address (for example: https://10.100.0.3:8789).
Enable Canvas Host
Make sure the web interface is enabled. In the same configuration file, locate the canvasHost section and confirm it is enabled: "enabled": true.
Configure Caddy
Now configure Caddy to securely forward requests to OpenClaw. Edit the Caddy configuration file: /etc/caddy/Caddyfile. Add your HomiPlay address (for example: https://10.100.0.3:8789) and forward traffic to 127.0.0.1:18789. This is the internal OpenClaw gateway endpoint.
Reload Caddy
After updating the configuration, reload Caddy so the changes take effect. Example: sudo systemctl reload caddy.
Test the Connection
Everything should now be ready. On your phone, laptop, or external device, open a browser and enter https://10.100.0.3:8789/ (replace the IP with your own HomiPlay address). If everything is configured correctly, you should now see the OpenClaw login screen.
Other Use Cases
Play your PS5 remotely just like you're at home.
Connect faster, play without lag, and enjoy clear visuals.
Learn MoreAccess Your Home NAS via HomiPlay
Securely and quickly access files, photos, and multimedia on your home NAS from anywhere.
Learn MoreSet up Mac screen sharing fast. Make remote control feel instant.
Combine HomiPlay's secure tunnel with macOS's built-in VNC screen sharing for a low-latency, high-security remote desktop experience.
Learn MoreSet up Windows Remote Desktop the simple way. Make remote work feel smooth.
Combine HomiPlay's secure tunnel with the built-in Windows Remote Desktop feature for a low-latency, high-security remote desktop experience.
Learn MoreStay safe on public WiFi with your own VPN.
Route your connection back home so your data is no longer exposed.
Learn More